
Creating a sales funnel doesn’t have to be expensive or complicated.
In this article, I’m going to show you how to build a sales funnel for free using systeme.io. I wrote a review about it a while ago if you wanna have a look.
There are plenty of sales funnel builders out there, but many of them come with hefty price tags and can be difficult to use. That’s why we’ll focus on systeme.io.
Systeme.io is a freemium funnel builder that I use to build sales funnels easily and efficiently. It offers a completely free plan that allows anyone to create and manage up to three sales funnels without needing to enter your credit card information.
This makes it an excellent choice for those who are just starting out or who want to test the waters before committing to a paid plan.
Now, let’s dive into the tutorial and get your sales funnel up and running!
How To Build a Funnel For Free
Before You Start
In this tutorial, I will show you how to built a three-page sales funnel.
- The first page is the sales page. This is where you’ll introduce your product or service, highlight its benefits, and encourage visitors to make a purchase.
- The second page will be the checkout page. Here, customers will enter their payment information and complete their purchase. It’s essential to keep this page simple and secure to ensure a smooth transaction process.
- Finally, the thank you page wraps up the funnel. This page serves to confirm the purchase and express your gratitude. It’s also a great place to provide any additional information or next steps, such as downloading their product or expecting an email with further details.
By the way, If you already have a systeme.io account, you can skip the first step – which is about creating your Systeme.io account. Just log in and follow along.
Step 1: Create a System.io Account
To sign up for a free plan on systeme.io, start by opening your browser and typing in the website address, or you can click this link.
Once you’re on the homepage, look for the option to create a free account.
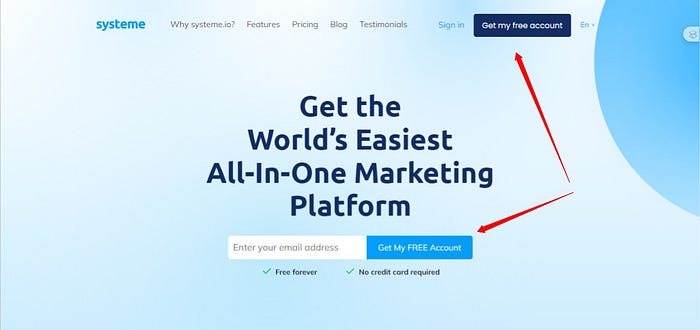
Enter your email address in the designated field, then click the button that says “Get my Free account“.
You’ll receive a confirmation email shortly after; open it and follow the instructions to activate your account.
Step 2: Set Up Your Payment Gateways
Head over to your systeme.io dashboard and click on the “Settings” menu.
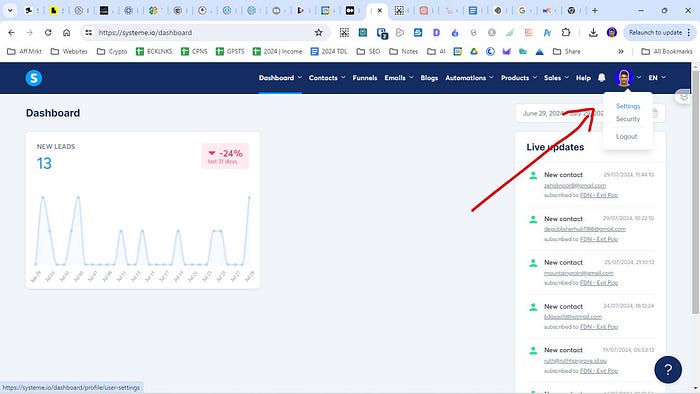
First, fill out your account information, making sure all details are correct.
Next, navigate to the “Payment Gateways” section. Here, you’ll see options to connect different payment methods.
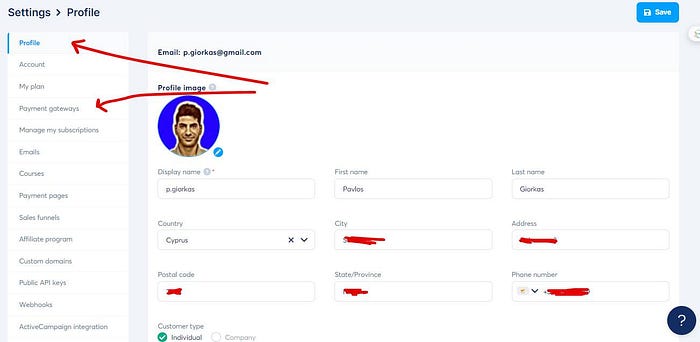
Select Stripe and PayPal as your payment gateways. To connect Stripe, click the “Connect Stripe” button and follow the prompts to log in to your Stripe account and authorize the connection.
For PayPal, click “Connect PayPal” and sign in to your PayPal account to complete the setup.
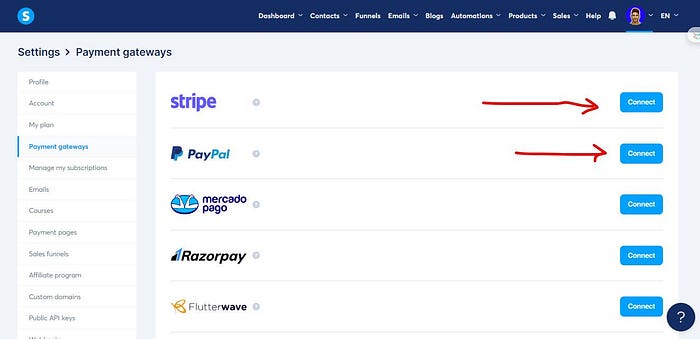
Keep in mind that there are other payment Gateways you can choose to connect to your account. Stripe and PayPal are the easiest and the ones that people (your future buyers) trust the most.
That’s it!
You’ve successfully set up your payment gateways and are ready to accept payments through your sales funnels.
Next, we’re going to create your product before building your funnel.
Step 3: Create Your Product
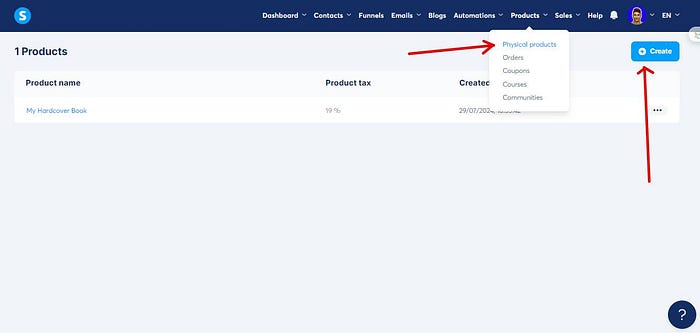
On the main menu, find the “Products” tab. Upon hovering your mouse, you are prompted to choose the type of product you want to create – whether it’s a physical product or a course.
In our case, we’re going to create an eBook and this tutorial will be based on building a sales funnel for selling an eBook. Selling eBooks or other digital items like audiobooks, we don’t have to create a product. We can still deliver them to customers in other ways, such as on a thank-you page or through an email after they buy. I’ll explain how to do that later — in the last step.
PHYSICAL PRODUCTS
In case you want to create a physical product, click first on the “Physical product” option from the drop-down menu and then “Create”
Upon clicking create, you’ll be prompted to enter the basic details of your product, including the name, description, and price.
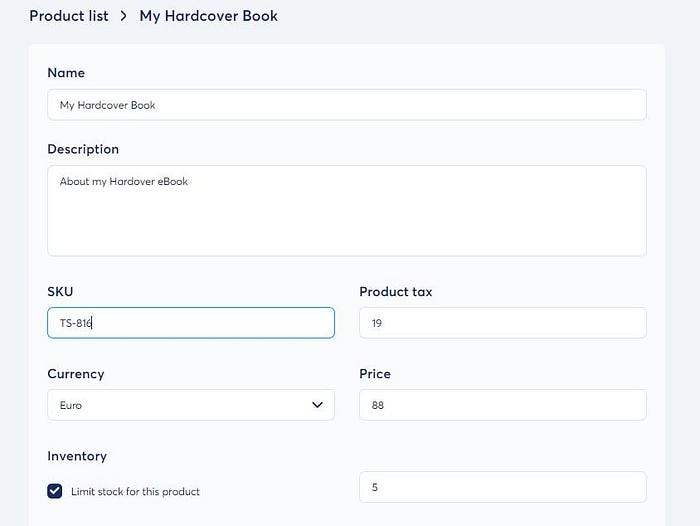
You’ll have to add pricing, images, variables as well.
COURSES
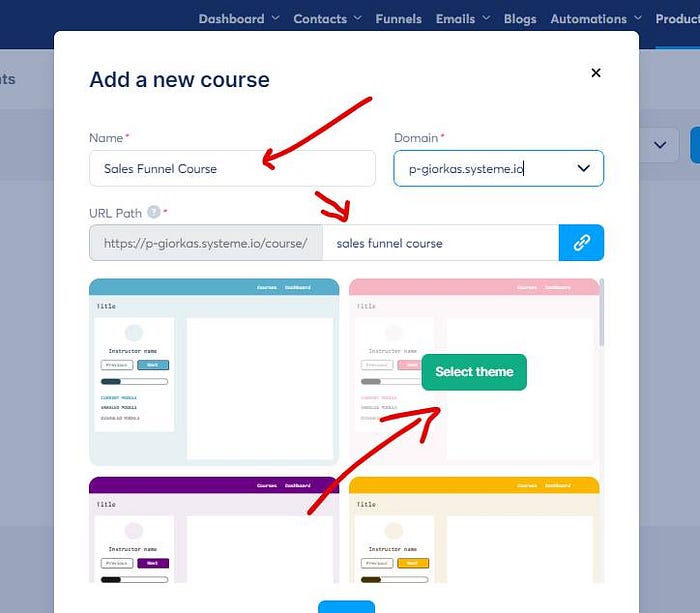
If you are setting up a course, click on the Courses tab and the the “Add a New Course” button.
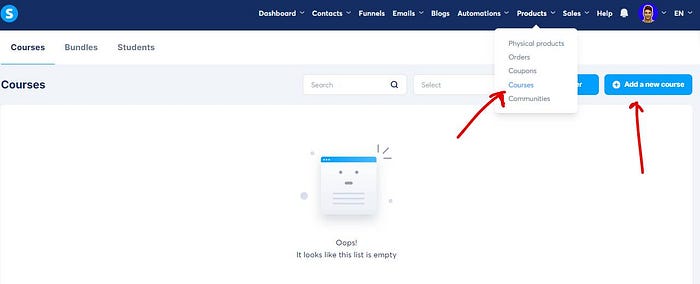
Upon clicking the Add a new course button a pop-up will appear and you will be prompted to complete basic info and choose a theme.
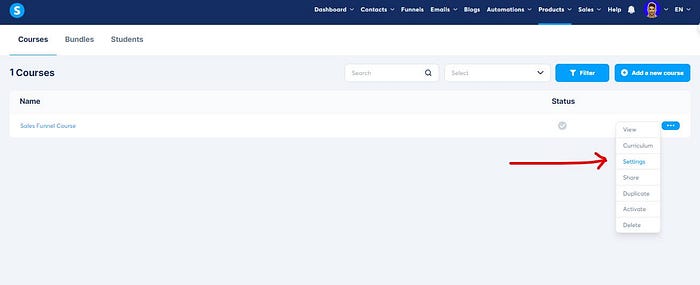
Next, click on the settings option and complete all the necessary fields.
👇👇
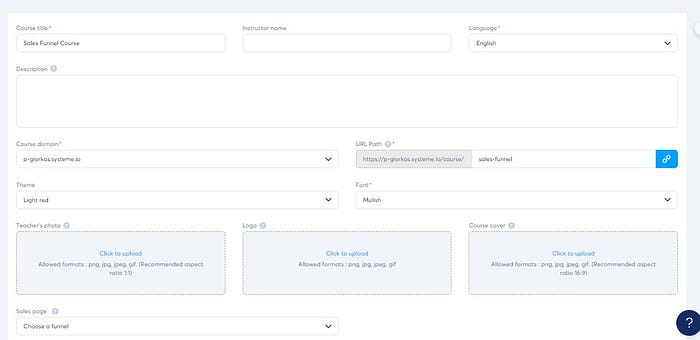
After you finish, click Save and you are done. The next step is to create tags and after that the actual funnel.
Step 4: Create Tags
Tags in Systeme allow you to categorize your contacts. It’s an important step and not to be skipped.
You want to be able to tag your buyers in order to market to them more products in the future.
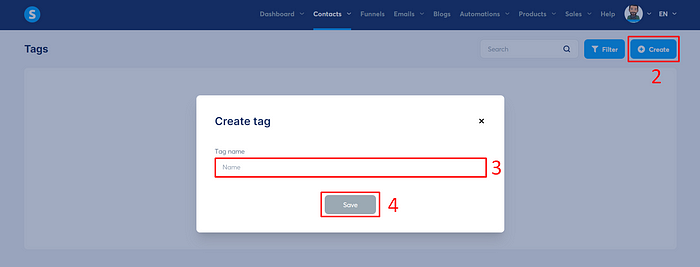
Hover over the “Contacts” tab in the main menu. From the dropdown, select “Tags.”
Once you’re in the Tags section, click the “Create Tag” button to set up a new tag. You’ll need to name your tag — something clear and easy to remember.
For example, you might name it “Purchased Course X” if you’re tracking customers who bought a particular course.
I am going to name it “eBook buyers” — for the sake of this tutorial.
After entering the tag name, click the “Save” button to finalize it.
Now, whenever a customer purchases my eBook, it will be automatically assigned with that tag.
More on that later though.
Keep in mind that with the freemium plan, you are only allowed to create 1 Tag. By upgrading your plan you will be eligible for 10 tags and more. Here’s Systeme.io’s pricing plans if you wanna have a look.
Finally, we’re ready to build the actual funnel.
Step 5: Build Your Funnel
To get started, click on the “Funnels” tab at the top menu. Next, click the “Create” button on your right-hand side.

When you create a funnel, you’ll need to
- choose a name,
- assign a domain (optional),
- select the type of funnel you want and..
- the currency you want to use.
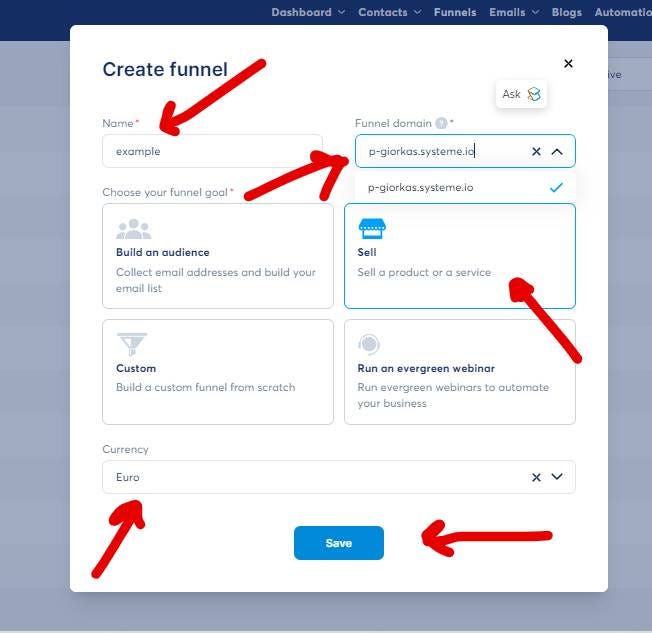
Give your funnel a name that reflects its purpose. I named it “Example”. By default, your funnel domain will be an extension of systeme.io.
I highly recommend setting up a custom domain to give your funnel a more professional look. If you’ve already set up a custom domain in your account, you can select it from the drop-down menu. If not, Systeme.io has a detailed article that walks you through the process.
Systeme.io offers four different funnel options.
The four funnel options are:
- Build an Audience: A simple funnel structure that includes a squeeze page and an opt-in thank you page. This funnel is perfect for building your email list.
- Sell: A sales funnel that comes preloaded with a customizable order form and thank you page. This is the funnel we’ll be using to generate sales.
- Custom: A blank template that allows you to create any type of page you want. This funnel is ideal for experienced marketers who want full control.
- Run an Evergreen Webinar: A specially designed funnel optimized for selling webinars. This option is only available on “Webinar” and “Unlimited” subscriptions.
Since we’re building a sales funnel to sell a product or service we’re going choosing the “SELL” goal.
Next, click “Save” to create your funnel. Your funnel will appear at the top of the page.
Click on the name of your funnel to view its contents.
By default, Systeme.io sets up two pages: the order form and the thank you page.
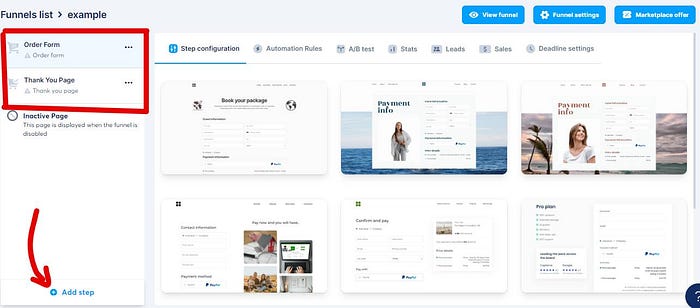
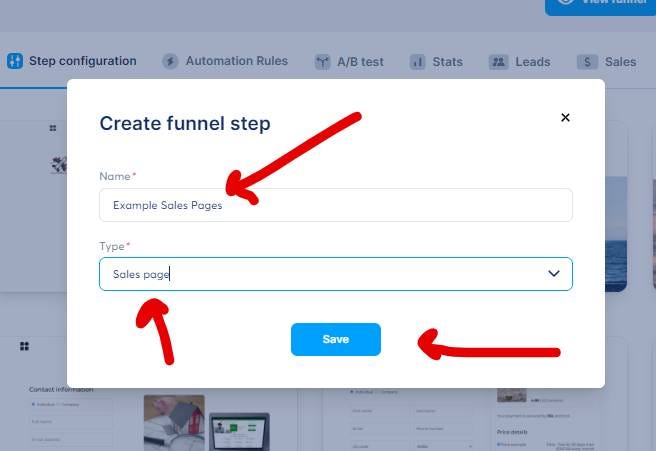
We also need a sales page, so click the “Add Step” button at the bottom. In the popup that appears, name your Sales Page and choose the Sales page option from the dropdown menu.
Click “Save.” The sales page will appear.
Step 6: Setting Up Your Sales Page
First things first, you’ll want to pick your sales page. System.io has many ready-made templates and I suggest you start with one of them. You’ll save time. (This link above will take you to the templates page 👆).
As you move your mouse over each one, you can either select it right away or choose to preview it.
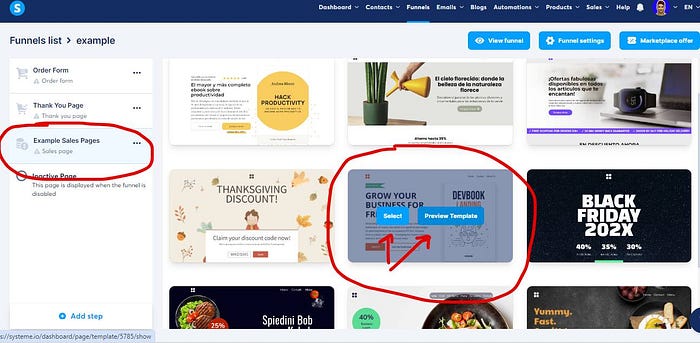
Once you find one you like, go ahead and pick it. It’ll pop up in the editor for you to work with. I chose this one..
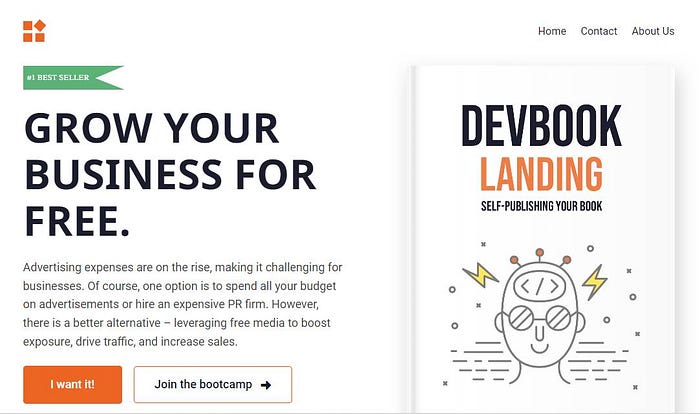
Pretty neat, isn’t it?
Now, click on “Edit Page” to start customizing your sales page.
The editor has three main parts:
- sections (they’re green),
- rows (those are blue), and..
- elements (you guessed it — orange).
Think of it like this: elements live in rows, and rows live in sections.
Begin moving your mouse to the template and you’ll see the colors of each of the main part.
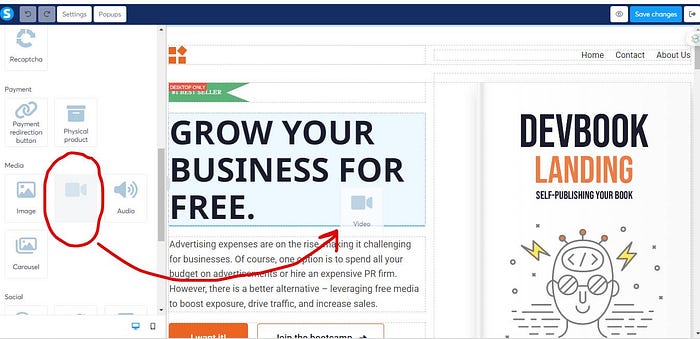
Want to add something to your page? It’s as easy as drag and drop.
Let’s say you want to add a video.
Just grab the video element from the side and plop it under a heading. You can then choose where your video comes from — a direct link, custom embed, or even upload your own file.
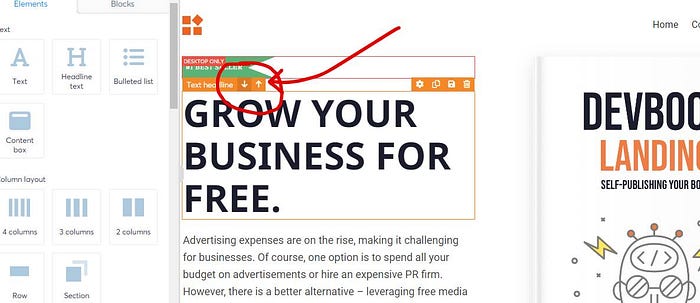
Need to move things around? No problem. Just click on the little orange arrows to shift elements where you want them.
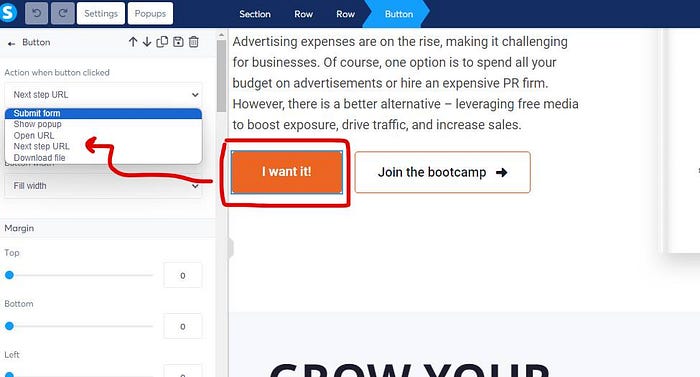
Buttons are a key part of any sales page. When you select a button, you can decide what happens when someone clicks it.
For example, you might want it to take them to your checkout page.
Looking for ready-made sections? Check out the “Blocks” tab on the side. You can drag in whole chunks like price plans or customer reviews.
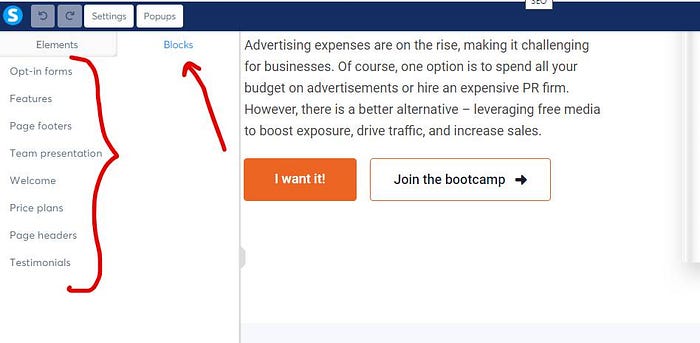
Upon clicking on any of the options, you’ll be presented with ready made blocks ready to drag and drop them to your sales page.
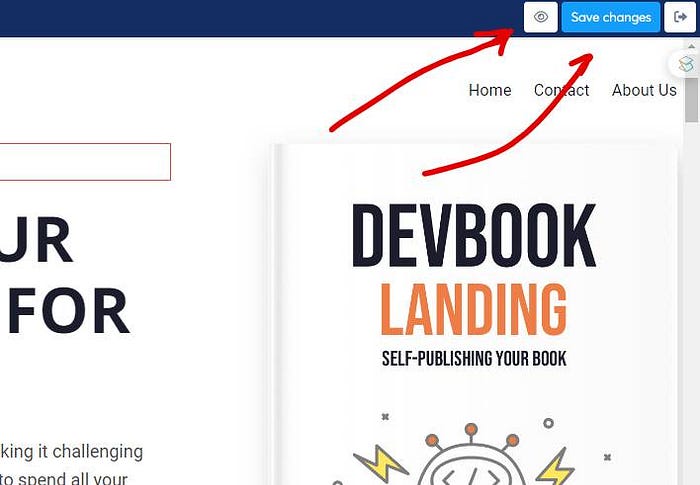
Once you’re happy with how everything looks, don’t forget to save your changes.
Want to see how it’ll look to your customers? Just click the eye icon to preview.
Remember, the more you play around with these tools, the better you’ll get. So don’t be afraid to experiment and have fun with it! If you need graphic designs like mockups, eBook covers etc. and you want to save time by outsourcing them, you can buy them on Fiverr. Sellers there can create the sales page for your send it over to you, import it to your systeme.io account and you’re done.
And there you have it! You’ve just created your very own sales page. Next up: setting up your checkout page.
Step 7: Set Up Your Checkout Page
Now, let’s set up your checkout page — it’s easier than you might think!
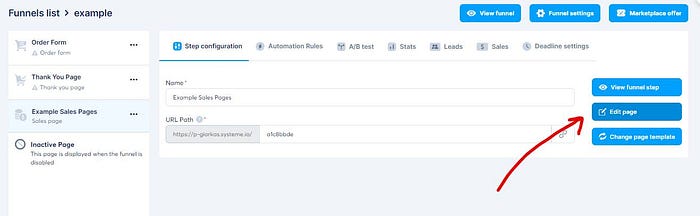
First, head back to the funnel menu. You’ll want to pick the order form, which is just a fancy name for your checkout page.
Choose a template that goes well with your sales page. You can preview each template to see which one is the most suitable.
Once you’ve picked your template, change the URL path to something like “checkout” or “order-form”. Then, hit “Edit Page” to adjust it to your liking.
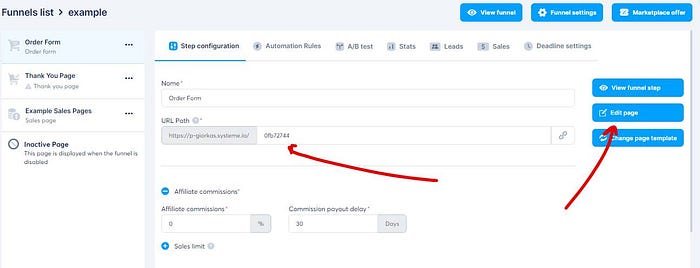
You can add or take away different parts — just as you did with the sales page before — making sure it fits your brand just right.
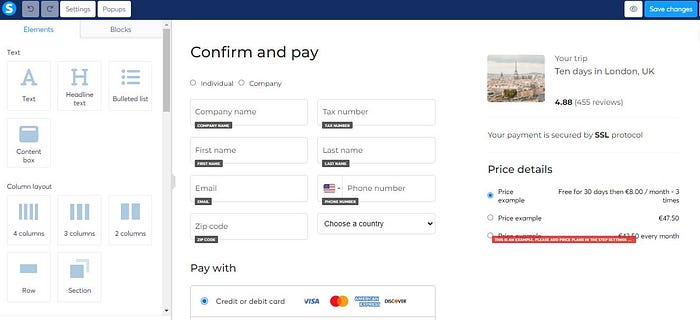
Want to boost your sales? Try adding an order bump. It’s super simple — just drag the order bump element and pop it above where customers pick how to pay.
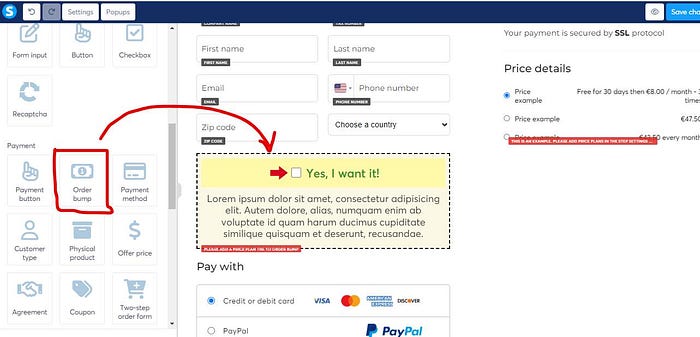
When you’re happy with how it looks, save your work and leave the editor.
Now, let’s set up how your checkout actually works.
Since in this tutorial I am selling an eBook, I will show you how to setup the final step with that in mind.
There are two ways to deliver the eBook to the buyer.
- Via email
- Via the Thank you page.
I’ll show you both options.
Option 1: Add eBook As Email Attachment
Go back to your funnel and find the “automation rules” tab. Click the “add rule” button.
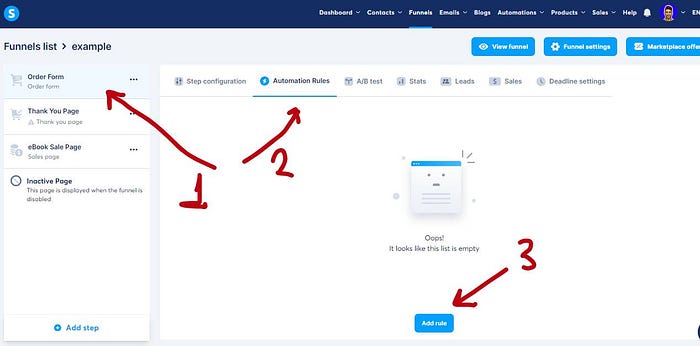
In the pop-up, click “New Sale”
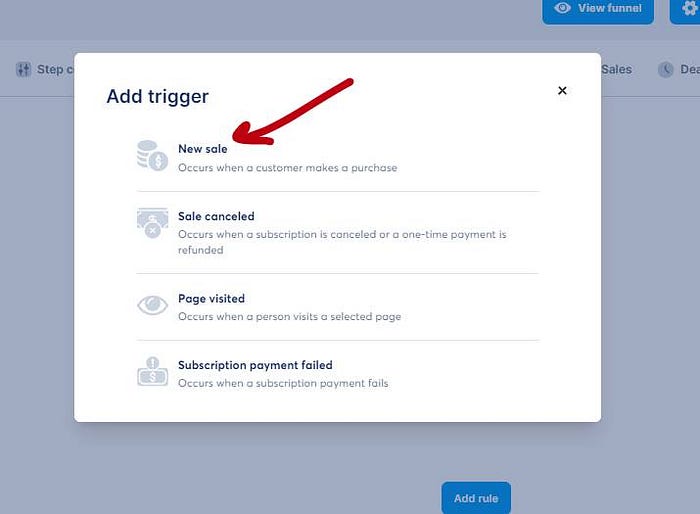
Essentially, we’re saying to the automation rule, when someone completes the checkout process, the automation to kick in.
Hover the three dots and click “edit automation rule”.
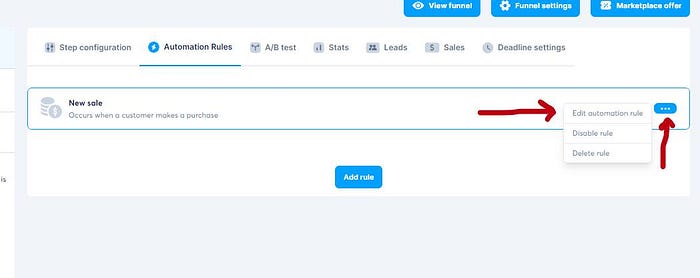
Click “add action”.

We’re going to create two actions.
One that will assign the tag we created before to each buyer and another action to send an email with the eBook to the buyer.
Just click on each action and it will be added to your automation tab.
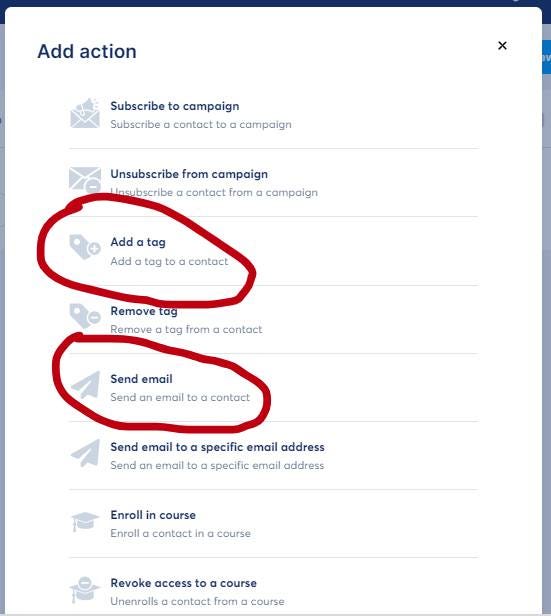
Next, assign the tag. As you can see, I already assigned the tag I’ve created before.

Next, I will create the email that will attach the eBook my customers bought. This email will automatically go to my customers as soon as they complete the checkout process.
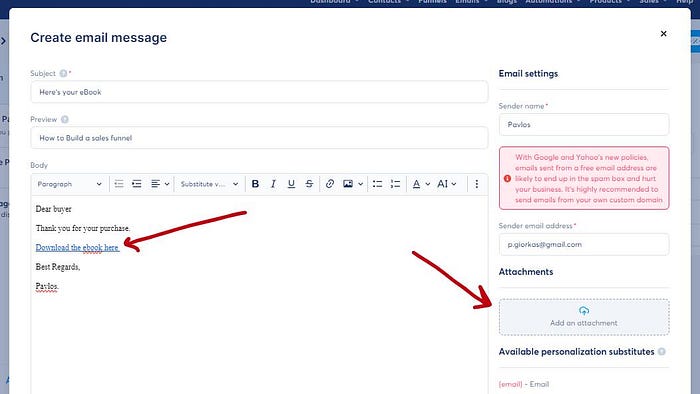
You can attach the eBook or add it as a link.
1. To add the eBook to the email through a downloadable link of the file, you must first host the eBook file on Google Drive, OneDrive, Dropbox, or a host of your choice.
2. Note that the maximum size of a file to add as an attachment is 5 megabytes.
Finally, click on “Save rule.” This process ensures that each customer who makes a purchase via your payment page will automatically be assigned a tag and will receive an email containing your eBook.
Systeme’s Freemium plan allows you to create only one automation. If you want to create more automation, I suggest upgrading to a paid plan.
Option 2: Deliver the eBook via the Thank you page
The second option is to deliver your eBook is through the Thank you page.
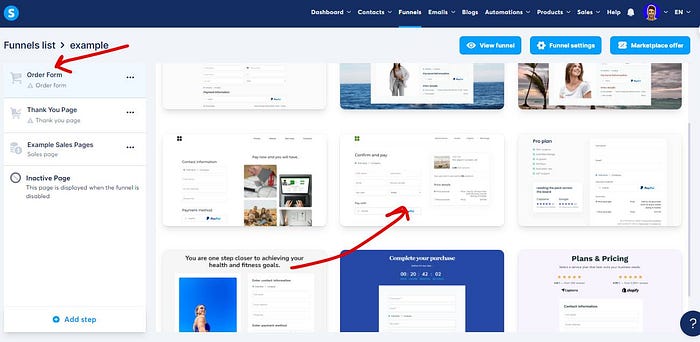
The first step is to ensure that your sales funnel pages are in order. The correct order is Sales Page >> Order Form >> Thank you Page.
Click and drag the Sales page to the first position.
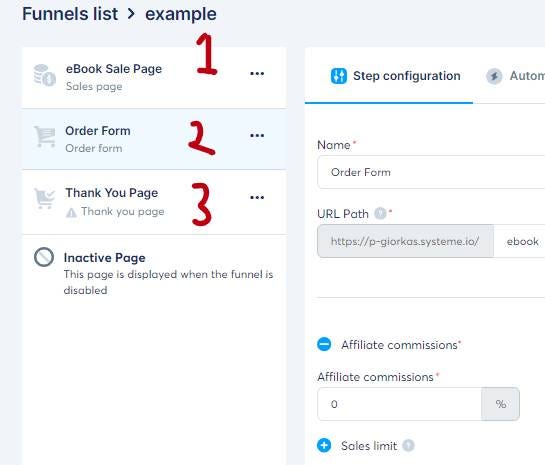
Keep in mind that the correct order should be respected, regardless of whether you are selling an eBook, a course, or a physical product, or whether you are delivering your product via email or a thank you page.
Anyways, next, select the Thank you page and choose a template as you did before wit the previous pages of the funnel.
Next click Edit Page to adjust the thank you page.
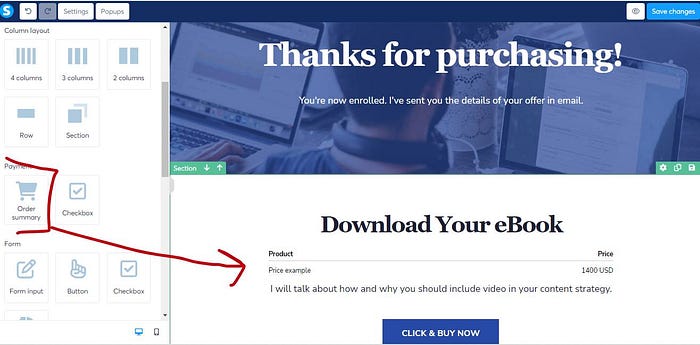
Optionally, you can add an order summary block. It will display automatically what your customers bought.
Then, we configure the button. Choose the download file option and upload your eBook.

Then, as soon as someone clicks on the download button, the file will download on their computer.
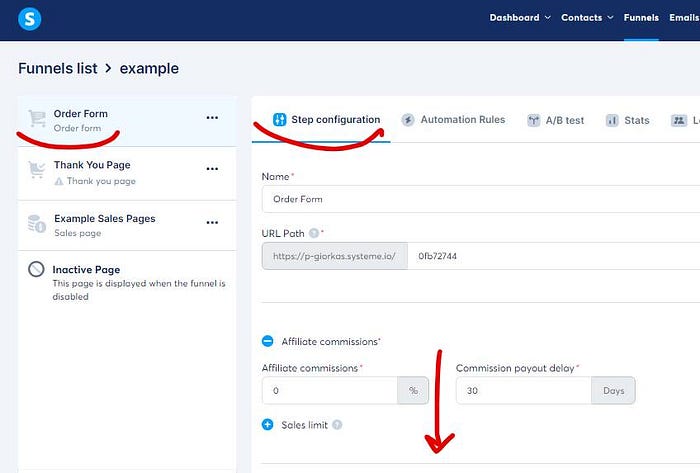
Step 7.1: Setting up your checkout page for Course and Physical products
Go back to the checkout page (or order form) and look for the step configuration section.
PHYSICAL PRODUCTS
In the case of a the Physical product, click on the physical product option and choose the product we created on Step 3.
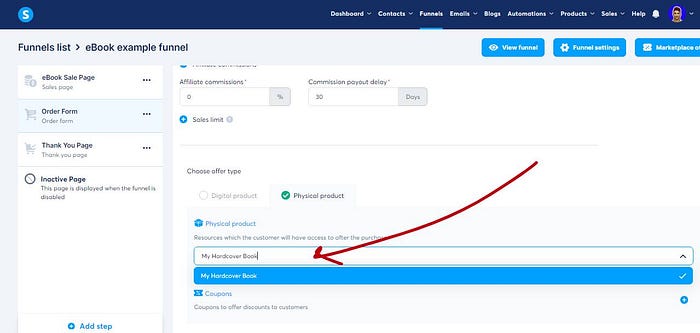
Click save and you are done. As soon as the order comes in, you’ll have to ship the product manually.
Keep in mind that you have to have your payment method connected. We did that in step 1.
Next, click on the “Edit page” button to open up the order form editor.
You’ll see a bunch of elements on the left side of your screen. Look for the “Payment” section — that’s where you’ll find the pieces you need.
First, decide where you want your product to show up on the page. Then, just grab the “Product” element and drag it over to that spot.
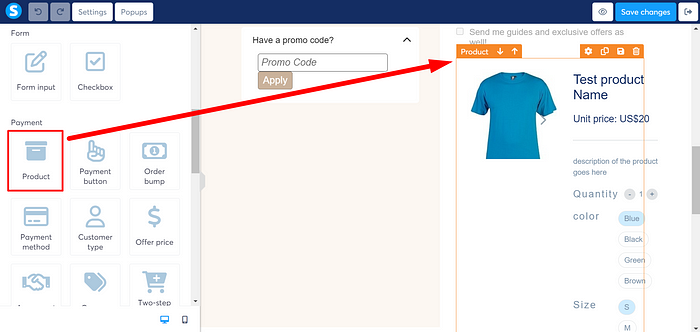
All the info you put in when you made your product will appear right there.
You’ll also want to show the price. Go back to that “Payment” section and find the “Offer price” element. Drag that over too.
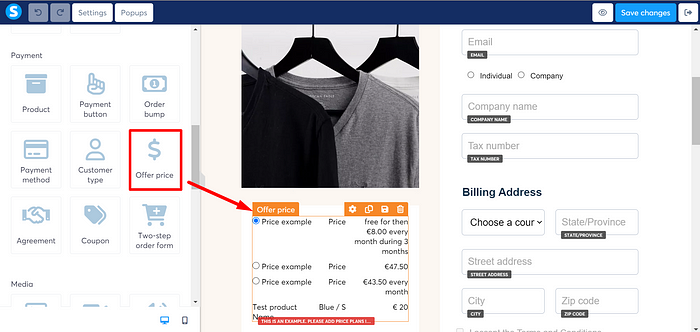
Now your product is all set up and ready to go!
Just remember — and this is super important — always hit that “Save” button in the top right corner when you’re done.
The editor doesn’t save stuff on its own, so you don’t want to lose all your hard work!
COURSES
To create a digital product (for your course) click the Create digital product link.
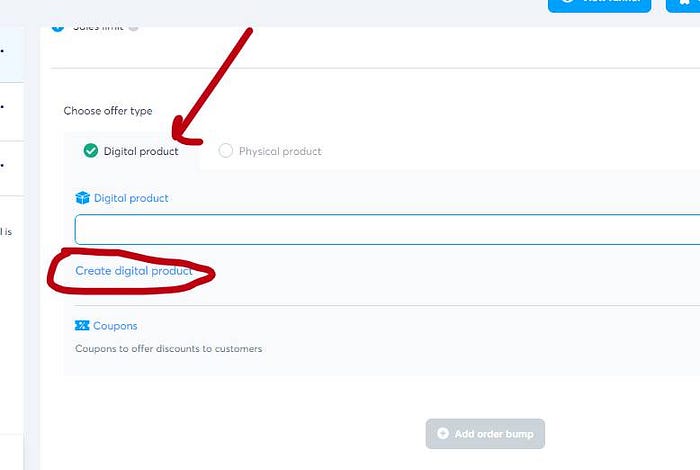
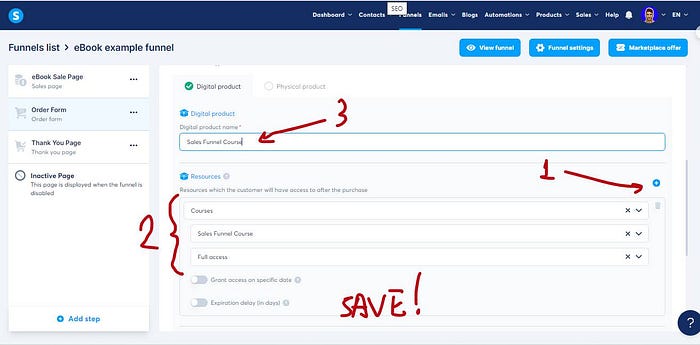
Time to add your course — the one we created on Step 3.
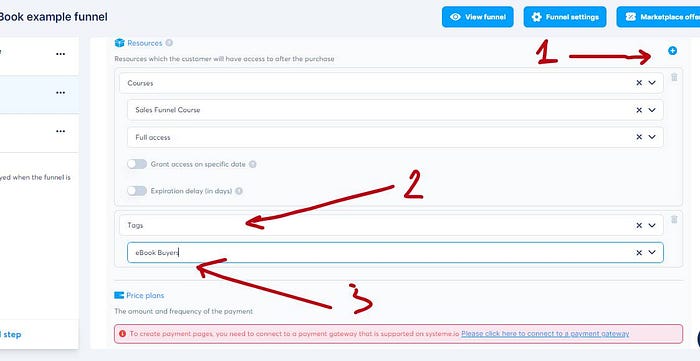
Click the plus button under resources, choose courses, and pick your course from the list.
Also, choose what access you give to your students:
- Full Access: When students pay, they get everything right away. It’s like buying a whole book — you can read any chapter you want from the start.
- Partial Access: The teacher picks which parts students can see. It’s kind of like getting only certain chapters of a book at first.
- Drip Content: Students get new stuff to learn over time. Think of it like getting a new chapter each week. The teacher decides how fast to give out the new parts.
Don’t forget to tag your customers!
Click the plus button, pick tags, and choose the tag you made earlier. This helps you keep track of who bought what.
And that’s it.
Don’t worry about telling your customers how to get into their course. After they buy, Systeme.io sends them an email that shows them how to create a password and access your course.
Setting up your checkout page might seem like a lot, but you’ve got this.
Take it step by step, and before you know it, you’ll be ready to start selling your products.
Your first step is to create a systeme.io account. It’s your action of the day.
Final Thoughts
I did it… I finally did it..

I finished this tutorial..
It took me exactly 4 hours and 12 minutes to finish this tutorial..
A share and a comment would be really appreciated.
Anyways, I hope you like and you find it useful. If you find any trouble or need any clarifications on creating your sales funnel with systeme, leave a comment or contact me and I
- answer back (always do)
- update the tutorial to make it ever more user-friendly.
In the meantime, don’t forget to share..
👉 Aκολούθησέ με στο Facebook και ενεργοποίησε τις ειδοποιήσεις για να λαμβάνεις τα νέα άρθρα μου.